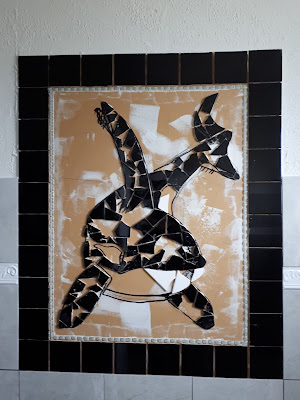
Apparently I am a sucker for punishment.
No sooner had the cuts and blood-blisters healed from my first mosaic project (see here: Renovation Madness: My Rather Ambitious Mosaic Hearth Project ) then my mind began imagining a mosaic for the upstairs Master Bedroom bathroom. It is an older style bathroom where the shower/tub and sink, counters, etc...are in one large area, and you open a door to a smaller adjacent room where there is a toilet and sink.
My DH (dear husband) Peter was nearing completion of said bathroom and I had a feeling the big bare wall in the toilet room needed a splash of fun. Yes...mentioning splash and toilet in the same line does not inspire pleasant imagery but I had to go there. *grin*
The first thing I needed to do was to think of a design. I used our living room view as inspiration for the last mosaic, so I wanted something more fantasy-like for the bathroom. I hear many artists and writers get their best ideas whilst sitting on the Porcelain Throne, so why not make the room conducive to creating big things! (*Oooops...that didn't sound right, did it. *giggle*)
I sketched a few pics out...mermaids, gallant ships...trying to get a feel for what moved me. (*okay...I am saying right here and now that if you see toilet humour in everything I say, its on you. I am NOT going there again...)
*kinda looks like Mae West-ish?
*Ahoy Matee!
I was thrilled to find a box of black tile at the thrift store (ReStore, Habitat For Humanity) so I tossed around the idea of a silhouette mermaid or ship...and then I found some peachy/orange tiles and decided on this combo...
And then...the Gods of Tortured Mosaic Makers smiled on me that afternoon when a pod of Killer Whales swam playfully past my balcony and I got this shot, and my best idea for the potential mosaic:
*Here is a before pic of the smaller bathroom (the place was badly outdated and disgustingly neglected...a renovators dream! I will post an 'entire house' reno blog when we are 100% done)) and then my initial sketching on the almost finished wall:
I won't rewrite the entire list of supplies and tools you would need to do this or another mosaic project but it IS in my first project (link above and highlighted).
Here is the space I was dealing with, and the mosaic area was about 3.5 feet by 3 feet:
Some material and tools on the ready:
*believe it or not, I used the thin bottom end of this tube of Blistex to scoop out glue in the tiny, thin spaces on the mosaic...go figure!
*glue and any handy old bowl...or cat dish, in this case
*notice how pretty this corner turned out...complete with 2 ceramic Orca! I found the vintage mirror in the thrift store I always go to. My DH is a Master Tiler and does amazing work on renos... *hearty applause* I just dabble in mosaics now...use his glue and tile cutter... and harass him to grout for me. *smile*
More pics as I draw on the base picture and start gluing:
*notice how I altered the original drawing. Don't be scared to make a mess...it will be covered after all!
*I found a sheet of this glass mini decorative tile at the ReStore and stripped it for a cute border
*I like to use as many large pieces as I can first and then work my way down to smaller, then smallest pieces. Not always...I do find 'perfect pieces' and use them right away too... but large chunks make one feel things are getting done! Its psychological...I am not very patient. *smile*
One has to dig out smaller or sunken pieces sometimes...
And then...all of the sudden, it's done!
*Still not done 100% with this small room...looking for accents and maybe a large red fake lobster or crab...or green starfish or cool pirate ship. I need a large color burst to offset the mass of grey...
In any case, I hope you enjoyed this journey with me...please pop back in a while and see if I have posted the entire house reno blog. It may take time as I work, but it will get done! It is been an amazing transformation and nearly done!


